# Wild Rydes

Wild Rydes is a simple web application that allows users to request unicorn rides. The application presents a user interface for selecting a location on the map where they would like to be picked up. The interface is connected to an API that will invoke a unicorn to be dispatched to their location. Each user will also be required to register for an account.

Technologies used:

* [AWS Lambda](https://aws.amazon.com/lambda/)
* [Amazon API Gateway](https://aws.amazon.com/api-gateway/)
* [Amazon S3](https://aws.amazon.com/s3/)
* [Amazon DynamoDB](https://aws.amazon.com/dynamodb/)
* [AWS Amplify](https://aws.amazon.com/amplify/)
* [Amazon Cognito](https://aws.amazon.com/cognito/)
* [AWS Cloud9 IDE](https://aws.amazon.com/cloud9/)
* [AWS IAM](https://aws.amazon.com/iam/)

The entirety of this lab will need to be deployed in a single region. Ensure that all services are using the same region.

<figure><img src="https://450836410-files.gitbook.io/~/files/v0/b/gitbook-x-prod.appspot.com/o/spaces%2Fgns9cN7UvH1POIBCfrRn%2Fuploads%2FTBlwMSDjAZE0JQgw9Q1T%2Fimage.png?alt=media&#x26;token=d40af453-ed9d-47eb-91aa-57c2e3366045" alt=""><figcaption></figcaption></figure>

Cloud9 will be used for this lab. It is an IDE provided by AWS. Any other IDE can also be used.

<figure><img src="https://450836410-files.gitbook.io/~/files/v0/b/gitbook-x-prod.appspot.com/o/spaces%2Fgns9cN7UvH1POIBCfrRn%2Fuploads%2FlS6xWlgzEP7hz6yPmZ9k%2Fimage.png?alt=media&#x26;token=f81804c9-e6c1-48bf-a6ad-92ac8f80523c" alt=""><figcaption></figcaption></figure>

Navigate to Cloud9 and create an environment. Name the environment and select New EC2 instance.

<figure><img src="https://450836410-files.gitbook.io/~/files/v0/b/gitbook-x-prod.appspot.com/o/spaces%2Fgns9cN7UvH1POIBCfrRn%2Fuploads%2FHIZGKLMPrFrfnGSo3YFi%2Fimage.png?alt=media&#x26;token=269d4434-125a-4742-9492-c675a1d15a0d" alt=""><figcaption></figcaption></figure>

Select t3.small. The other settings can be kept as default.

<figure><img src="https://450836410-files.gitbook.io/~/files/v0/b/gitbook-x-prod.appspot.com/o/spaces%2Fgns9cN7UvH1POIBCfrRn%2Fuploads%2FEU4kaXBN8epE2KFwem7c%2Fimage.png?alt=media&#x26;token=213b6fc3-744b-435a-80d6-585d8e9350ed" alt=""><figcaption></figcaption></figure>

<figure><img src="https://450836410-files.gitbook.io/~/files/v0/b/gitbook-x-prod.appspot.com/o/spaces%2Fgns9cN7UvH1POIBCfrRn%2Fuploads%2FAqYuKGeISzBPSnkWABuF%2Fimage.png?alt=media&#x26;token=f29cb59e-0cc9-4372-bb3a-97d0f8cfee2a" alt=""><figcaption></figcaption></figure>

Create the environment and let it provision.

<figure><img src="https://450836410-files.gitbook.io/~/files/v0/b/gitbook-x-prod.appspot.com/o/spaces%2Fgns9cN7UvH1POIBCfrRn%2Fuploads%2FFDMjjMmGZeQBWbGGRPWf%2Fimage.png?alt=media&#x26;token=cb666e59-69c6-49e3-bc43-3a604d996ee6" alt=""><figcaption></figcaption></figure>

Once the Cloud9 environment is deployed, open up the IDE.
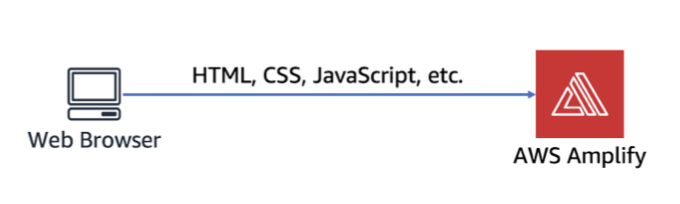
<figure><img src="https://450836410-files.gitbook.io/~/files/v0/b/gitbook-x-prod.appspot.com/o/spaces%2Fgns9cN7UvH1POIBCfrRn%2Fuploads%2FovvxlO1D6jJyEmnOxN0z%2Fimage.png?alt=media&#x26;token=7f2f75e9-be3e-4d95-8c13-7fc66f145f63" alt=""><figcaption></figcaption></figure>

## Static Web Hosting

[AWS Amplify](https://aws.amazon.com/amplify/) will be used to host the static resources for the application. Users will visit the site using a public URL exposed by the Amplify console.

<figure><img src="https://450836410-files.gitbook.io/~/files/v0/b/gitbook-x-prod.appspot.com/o/spaces%2Fgns9cN7UvH1POIBCfrRn%2Fuploads%2FW0QG8YMcMcpeIVC3Obbm%2Fimage.png?alt=media&#x26;token=d37c5674-c795-47fb-8870-f61b2ad7b302" alt=""><figcaption></figcaption></figure>

### Repository

[AWS CodeCommit](https://aws.amazon.com/codecommit/) will be used to host the site's repository.

Create a new CodeCommit repository.

```
aws codecommit create-repository \
  --repository-name wild-rydes
```

<figure><img src="https://450836410-files.gitbook.io/~/files/v0/b/gitbook-x-prod.appspot.com/o/spaces%2Fgns9cN7UvH1POIBCfrRn%2Fuploads%2Fz7FiMemfdtIzGkOOAy4A%2Fimage.png?alt=media&#x26;token=9e1e117e-6bf9-407a-ba7a-ff83b9fa23d8" alt=""><figcaption></figcaption></figure>

Clone the repository from GitHub.

```
git clone https://github.com/aws-samples/aws-serverless-webapp-workshop.git
```

<figure><img src="https://450836410-files.gitbook.io/~/files/v0/b/gitbook-x-prod.appspot.com/o/spaces%2Fgns9cN7UvH1POIBCfrRn%2Fuploads%2FQxl7QmL9R5fSLDtMVuWa%2Fimage.png?alt=media&#x26;token=733a8ebd-1c62-4407-b472-078f4fb11cfb" alt=""><figcaption></figcaption></figure>

Navigate to the aws-serverless-webapp-workshop directory.

```
cd aws-serverless-webapp-workshop
```

<figure><img src="https://450836410-files.gitbook.io/~/files/v0/b/gitbook-x-prod.appspot.com/o/spaces%2Fgns9cN7UvH1POIBCfrRn%2Fuploads%2FyoSZKujdUTlv89SM03zX%2Fimage.png?alt=media&#x26;token=9b1d0f57-6adb-4f61-92f8-25a3a3a4792b" alt=""><figcaption></figcaption></figure>

Install git-subtree and then split the WildRydesVue code into its branch.

```
sudo yum install git-subtree -y
```

<figure><img src="https://450836410-files.gitbook.io/~/files/v0/b/gitbook-x-prod.appspot.com/o/spaces%2Fgns9cN7UvH1POIBCfrRn%2Fuploads%2FYSMD5Kd715ffUtZmpG2j%2Fimage.png?alt=media&#x26;token=be5696bb-b85a-4c43-8a52-5f0de78c1818" alt=""><figcaption></figcaption></figure>

```
git subtree split -P resources/code/WildRydesVue -b WildRydesVue
```

<figure><img src="https://450836410-files.gitbook.io/~/files/v0/b/gitbook-x-prod.appspot.com/o/spaces%2Fgns9cN7UvH1POIBCfrRn%2Fuploads%2FJjGSN55wMEaEy4MhhTdj%2Fimage.png?alt=media&#x26;token=d0c6034c-e7a0-492e-adc5-ac94d9d65694" alt=""><figcaption></figcaption></figure>

Create a new directory for the CodeCommit repository.

```
mkdir ../wild-rydes && cd ../wild-rydes
```

<figure><img src="https://450836410-files.gitbook.io/~/files/v0/b/gitbook-x-prod.appspot.com/o/spaces%2Fgns9cN7UvH1POIBCfrRn%2Fuploads%2FICVQQmwA23KS4aH7t5Hn%2Fimage.png?alt=media&#x26;token=7a9f390a-d2cd-4e8c-bcdd-f0c7fc13519a" alt=""><figcaption></figcaption></figure>

Initialize a new git repository.

```
git init
```

<figure><img src="https://450836410-files.gitbook.io/~/files/v0/b/gitbook-x-prod.appspot.com/o/spaces%2Fgns9cN7UvH1POIBCfrRn%2Fuploads%2FxwvTe8UjwctTPaVn1eRS%2Fimage.png?alt=media&#x26;token=7566c745-2d16-4349-8089-4f3de1e1d981" alt=""><figcaption></figcaption></figure>

Pull the WildRydesVue branch into the new repository.

```
git pull ../aws-serverless-webapp-workshop WildRydesVue
```

<figure><img src="https://450836410-files.gitbook.io/~/files/v0/b/gitbook-x-prod.appspot.com/o/spaces%2Fgns9cN7UvH1POIBCfrRn%2Fuploads%2FFxyNxRFk7fu0H92n8LPP%2Fimage.png?alt=media&#x26;token=875241b3-6a03-413e-a2b8-1e6c72a60523" alt=""><figcaption></figcaption></figure>

Add the CodeCommit repository as a remote.

```
git remote add origin codecommit://wild-rydes
```

<figure><img src="https://450836410-files.gitbook.io/~/files/v0/b/gitbook-x-prod.appspot.com/o/spaces%2Fgns9cN7UvH1POIBCfrRn%2Fuploads%2FXaPsTEjep3MvOOeKBnP5%2Fimage.png?alt=media&#x26;token=c1d3e753-444b-454a-a891-27f2a3037061" alt=""><figcaption></figcaption></figure>

Push the code to the new CodeCommit repository.

```
git push -u origin master
```

<figure><img src="https://450836410-files.gitbook.io/~/files/v0/b/gitbook-x-prod.appspot.com/o/spaces%2Fgns9cN7UvH1POIBCfrRn%2Fuploads%2FyJkBTFgmQ3uEBUcSaXOt%2Fimage.png?alt=media&#x26;token=21a0e89b-49cc-40ff-99ae-ac0f25cffab8" alt=""><figcaption></figcaption></figure>

Remove the local repository that was created earlier.

```
rm -rf ../aws-serverless-webapp-workshop
```

<figure><img src="https://450836410-files.gitbook.io/~/files/v0/b/gitbook-x-prod.appspot.com/o/spaces%2Fgns9cN7UvH1POIBCfrRn%2Fuploads%2F2o8Dh6tBuZ3myW5OKf5j%2Fimage.png?alt=media&#x26;token=648cd9ee-a828-4cd5-99ca-baf5c36e5f33" alt=""><figcaption></figcaption></figure>

### Deploy

[AWS Amplify Console ](https://aws.amazon.com/amplify/console/)will be used to deploy the site that was committed to git.&#x20;

To confirm that the repository was created in CodeCommit, you can navigate to CodeCommit in the AWS console.

<figure><img src="https://450836410-files.gitbook.io/~/files/v0/b/gitbook-x-prod.appspot.com/o/spaces%2Fgns9cN7UvH1POIBCfrRn%2Fuploads%2FvT1jhAr56SvlbPqV69NO%2Fimage.png?alt=media&#x26;token=c73bd602-858e-41dc-9707-817d9575986f" alt=""><figcaption></figcaption></figure>

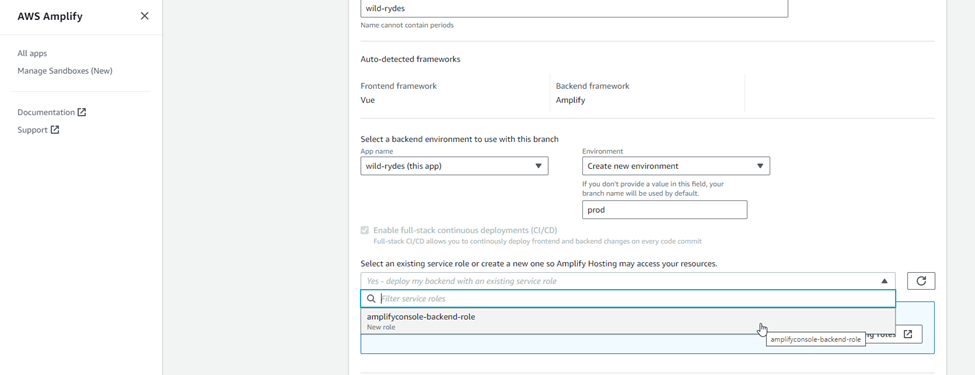
Navigate to AWS Amplify within the console and select Amplify Hosting Host your web app.

<figure><img src="https://450836410-files.gitbook.io/~/files/v0/b/gitbook-x-prod.appspot.com/o/spaces%2Fgns9cN7UvH1POIBCfrRn%2Fuploads%2FReghKCf19SUc30cnTkrl%2Fimage.png?alt=media&#x26;token=5e646077-cb20-415c-acc0-1b8b1043425d" alt=""><figcaption></figcaption></figure>

Select AWS CodeCommit.

<figure><img src="https://450836410-files.gitbook.io/~/files/v0/b/gitbook-x-prod.appspot.com/o/spaces%2Fgns9cN7UvH1POIBCfrRn%2Fuploads%2Ff9DicqITzML1pCg4HhKc%2Fimage.png?alt=media&#x26;token=b210de78-e8ec-4e28-ae26-f99ad89caf69" alt=""><figcaption></figcaption></figure>

Select the dropdown and the repository should show up.

<figure><img src="https://450836410-files.gitbook.io/~/files/v0/b/gitbook-x-prod.appspot.com/o/spaces%2Fgns9cN7UvH1POIBCfrRn%2Fuploads%2FCOWfIFNZgEPh3hbi8hTC%2Fimage.png?alt=media&#x26;token=f4ef4d22-2e4c-40ef-a6d6-9bbaa569af17" alt=""><figcaption></figcaption></figure>

Select Create New Environment and name it “prod”.

<figure><img src="https://450836410-files.gitbook.io/~/files/v0/b/gitbook-x-prod.appspot.com/o/spaces%2Fgns9cN7UvH1POIBCfrRn%2Fuploads%2FwRwEdujHPREVyyqItoWf%2Fimage.png?alt=media&#x26;token=b82bc9df-ca4d-40cc-bd3b-4385fd1e10d1" alt=""><figcaption></figcaption></figure>

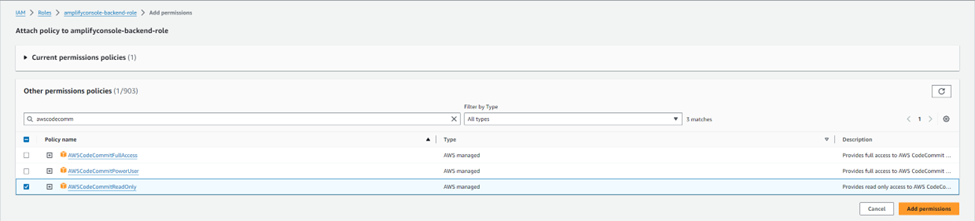
Next, a role needs to be created. IAM > Roles > Create Role. Select AWS service and Amplify as the use case.

<figure><img src="https://450836410-files.gitbook.io/~/files/v0/b/gitbook-x-prod.appspot.com/o/spaces%2Fgns9cN7UvH1POIBCfrRn%2Fuploads%2FcDmrMe3ZHkB4qcsnx9sq%2Fimage.png?alt=media&#x26;token=6ac9bf60-6723-422c-9fd4-9abed5283e57" alt=""><figcaption></figcaption></figure>

Ensure AdministratorAccess-Amplify is attached.

<figure><img src="https://450836410-files.gitbook.io/~/files/v0/b/gitbook-x-prod.appspot.com/o/spaces%2Fgns9cN7UvH1POIBCfrRn%2Fuploads%2Fs2AusIsSJk9gonUSCNbx%2Fimage.png?alt=media&#x26;token=b470f5db-1fb5-47f3-8b7a-6262a5cfcd7a" alt=""><figcaption></figcaption></figure>

Name the role amplifyconsole-backend-role.

<figure><img src="https://450836410-files.gitbook.io/~/files/v0/b/gitbook-x-prod.appspot.com/o/spaces%2Fgns9cN7UvH1POIBCfrRn%2Fuploads%2FQoRSzue2dwnhscew2c7S%2Fimage.png?alt=media&#x26;token=c785f2ea-dc70-4f9f-bee2-ec0fad10a90d" alt=""><figcaption></figcaption></figure>

After creating, select attach policies.

<figure><img src="https://450836410-files.gitbook.io/~/files/v0/b/gitbook-x-prod.appspot.com/o/spaces%2Fgns9cN7UvH1POIBCfrRn%2Fuploads%2FBQCKQoZEHIOaaBFQPQ7n%2Fimage.png?alt=media&#x26;token=04c127f1-9507-4e97-b889-8ea18f69904e" alt=""><figcaption></figcaption></figure>

Attach the AWSCodeCommitReadOnly policy.

<figure><img src="https://450836410-files.gitbook.io/~/files/v0/b/gitbook-x-prod.appspot.com/o/spaces%2Fgns9cN7UvH1POIBCfrRn%2Fuploads%2Flldxg9MBtIfqSzPek96r%2Fimage.png?alt=media&#x26;token=b3990e1e-9312-4825-aa93-f0bba424497f" alt=""><figcaption></figcaption></figure>

Return to the AWS Amplify Console. Under wild-rydes, the new role should be available to assign.

<figure><img src="https://450836410-files.gitbook.io/~/files/v0/b/gitbook-x-prod.appspot.com/o/spaces%2Fgns9cN7UvH1POIBCfrRn%2Fuploads%2FWILm0oDGlqkgMZBFWLXp%2Fimage.png?alt=media&#x26;token=26623060-443f-4801-9c79-35f971552aee" alt=""><figcaption></figcaption></figure>

Select Save and Deploy.

<figure><img src="https://450836410-files.gitbook.io/~/files/v0/b/gitbook-x-prod.appspot.com/o/spaces%2Fgns9cN7UvH1POIBCfrRn%2Fuploads%2Fqw1XN9AHzw1QbZK68AFB%2Fimage.png?alt=media&#x26;token=c3b17ca3-7d06-49da-8c69-d1247fd65d24" alt=""><figcaption></figcaption></figure>

The process can take a few minutes.

<figure><img src="https://450836410-files.gitbook.io/~/files/v0/b/gitbook-x-prod.appspot.com/o/spaces%2Fgns9cN7UvH1POIBCfrRn%2Fuploads%2FU6bAHtozvpM84Zcf8Jis%2Fimage.png?alt=media&#x26;token=b37b0116-09be-453e-a876-fa26e05cf54a" alt=""><figcaption></figcaption></figure>

Once complete, visit the URL to launch the Wild Rydes site.

<figure><img src="https://450836410-files.gitbook.io/~/files/v0/b/gitbook-x-prod.appspot.com/o/spaces%2Fgns9cN7UvH1POIBCfrRn%2Fuploads%2FFbehSQgSMzLhLk5j5EYc%2Fimage.png?alt=media&#x26;token=46e64271-72d8-4b5d-b8b9-d9a7330b5b55" alt=""><figcaption></figcaption></figure>

### Modify

AWS Amplify has the ability to rebuild and redeploy the web application when changes are detected in the repository. This Modify section shows how changes to the title affect the site.

In the Cloud9 IDE, navigate to wild rydes > public > index.html.

<figure><img src="https://450836410-files.gitbook.io/~/files/v0/b/gitbook-x-prod.appspot.com/o/spaces%2Fgns9cN7UvH1POIBCfrRn%2Fuploads%2FBOkyPHNmhy4MbXfso0e6%2Fimage.png?alt=media&#x26;token=52d06dfe-4d07-4add-bd75-5c3000aef617" alt=""><figcaption></figcaption></figure>

Change the on line 8 and save the file.

<figure><img src="https://450836410-files.gitbook.io/~/files/v0/b/gitbook-x-prod.appspot.com/o/spaces%2Fgns9cN7UvH1POIBCfrRn%2Fuploads%2F5a5AKFDPLUc4YDCZdswK%2Fimage.png?alt=media&#x26;token=e34feb71-3324-4289-b1ba-b560c665535e" alt=""><figcaption></figcaption></figure>

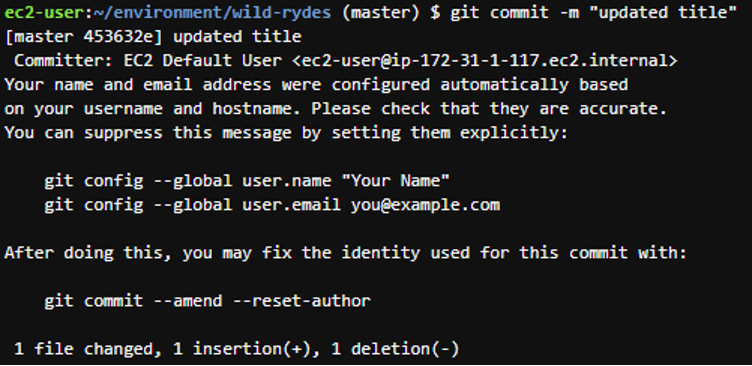
Commit the git repository.

```
git add .
```

<figure><img src="https://450836410-files.gitbook.io/~/files/v0/b/gitbook-x-prod.appspot.com/o/spaces%2Fgns9cN7UvH1POIBCfrRn%2Fuploads%2FAjfeUkWGNWUQbUqQWZSY%2Fimage.png?alt=media&#x26;token=9ad5f02b-6dea-4273-b656-816a8724d2aa" alt=""><figcaption></figcaption></figure>

```
git commit -m "updated title"
```

<figure><img src="https://450836410-files.gitbook.io/~/files/v0/b/gitbook-x-prod.appspot.com/o/spaces%2Fgns9cN7UvH1POIBCfrRn%2Fuploads%2FgYlCYqJji2qg512Pamf7%2Fimage.png?alt=media&#x26;token=0a62ab25-9d98-41ec-96f9-1317a30acbc1" alt=""><figcaption></figcaption></figure>

```
git push
```

<figure><img src="https://450836410-files.gitbook.io/~/files/v0/b/gitbook-x-prod.appspot.com/o/spaces%2Fgns9cN7UvH1POIBCfrRn%2Fuploads%2FpxIc0nCdicdXQZeFbKpp%2Fimage.png?alt=media&#x26;token=4991a55d-2008-4c18-bfe1-2b3444cc7547" alt=""><figcaption></figcaption></figure>

Revisit the site and you can see that the title changed.

<figure><img src="https://450836410-files.gitbook.io/~/files/v0/b/gitbook-x-prod.appspot.com/o/spaces%2Fgns9cN7UvH1POIBCfrRn%2Fuploads%2FhwgV0QK4cg48vCRNha17%2Fimage.png?alt=media&#x26;token=e9ceeab6-c1ae-4de0-a0e5-5e21a22572c2" alt=""><figcaption></figcaption></figure>

## User Management

### Amplify CLI

The site will require users to authenticate to the application. If the user does not have an account, they will need to register (email/password). For this lab, Amazon Cognito will be the IAM solution.&#x20;

After registration, users will be sent a confirmation email containing a verification code. They will then need to return to the application, log in, and enter the code. Once the account is confirmed, a JavaScript function reaches out to Cognito, authenticates using Secure Remote Password (SRP), and sends back a JSON Web Token (JWT). The token will contain information about the user's identity and be used to authenticate against the API in a later section.

<figure><img src="https://450836410-files.gitbook.io/~/files/v0/b/gitbook-x-prod.appspot.com/o/spaces%2Fgns9cN7UvH1POIBCfrRn%2Fuploads%2FMvFsUMTzY7x6ZtnjIxKe%2Fimage.png?alt=media&#x26;token=3ff4dac8-98a4-4858-92af-e6666fbc6839" alt=""><figcaption></figcaption></figure>

Install the Amplify CLI.

```
npm install -g @aws-amplify/cli
```

<figure><img src="https://450836410-files.gitbook.io/~/files/v0/b/gitbook-x-prod.appspot.com/o/spaces%2Fgns9cN7UvH1POIBCfrRn%2Fuploads%2Fy3mpeHjlCsq4ej7yO3nj%2Fimage.png?alt=media&#x26;token=952d4b90-7754-493f-9bbd-110dfb6a9c00" alt=""><figcaption></figcaption></figure>

Configure the default AWS profile.

```
echo '[profile default]' > ~/.aws/config
```

<figure><img src="https://450836410-files.gitbook.io/~/files/v0/b/gitbook-x-prod.appspot.com/o/spaces%2Fgns9cN7UvH1POIBCfrRn%2Fuploads%2FwcaaH4ZRMLIlUvFUoD3x%2Fimage.png?alt=media&#x26;token=7857b865-15fb-433f-9d8d-bdbe3510ba58" alt=""><figcaption></figcaption></figure>

Ensure you are in the root directory for wild-rydes and initialize the CLI.

```
amplify init
```

<figure><img src="https://450836410-files.gitbook.io/~/files/v0/b/gitbook-x-prod.appspot.com/o/spaces%2Fgns9cN7UvH1POIBCfrRn%2Fuploads%2FRfkSxLXOklZMLD7EkEIZ%2Fimage.png?alt=media&#x26;token=cd926d01-5e61-4025-b63a-232ca19a3e34" alt=""><figcaption></figcaption></figure>

The Amplify CLI will be used to create a user pool within Cognito.&#x20;

```
amplify add auth
```

Add the Cognito user pool

\> Do you want to use the default authentication and security configuration? "Default configuration"

\> How do you want users to be able to sign in? "Username"

\> Do you want to configure advanced settings? "No, I am done."

<figure><img src="https://450836410-files.gitbook.io/~/files/v0/b/gitbook-x-prod.appspot.com/o/spaces%2Fgns9cN7UvH1POIBCfrRn%2Fuploads%2Fo0Y6WsZ4CE3NjJWCqhtS%2Fimage.png?alt=media&#x26;token=01bb78a4-c32b-4c7b-aa66-334dac8b67b2" alt=""><figcaption></figcaption></figure>

Commit the changes to the git repository. Once the application is successfully deployed, a user pool will be created in Cognito.

```
git add .

git commit -m "Configure Cognito"

git push
```

<figure><img src="https://450836410-files.gitbook.io/~/files/v0/b/gitbook-x-prod.appspot.com/o/spaces%2Fgns9cN7UvH1POIBCfrRn%2Fuploads%2FScoSw83KB5Cp2sBXRMri%2Fimage.png?alt=media&#x26;token=b975ed5d-8c59-4ccb-b39e-a40ff4653cf3" alt=""><figcaption></figcaption></figure>

Amplify will pick up the changes and begin building and deploying.

Navigate to the Amazon Cognito Console. Under User Pools, you should see the new user pool created.

<figure><img src="https://450836410-files.gitbook.io/~/files/v0/b/gitbook-x-prod.appspot.com/o/spaces%2Fgns9cN7UvH1POIBCfrRn%2Fuploads%2FClZsIJ4st9WUgMuwkX8e%2Fimage.png?alt=media&#x26;token=2e5544c0-ae52-4b67-9775-cd4bc050358a" alt=""><figcaption></figcaption></figure>

Rather than configuring each service through a constructor or constants file, Amplify supports configuration through a centralized file called aws-exports.js which defines all the regions and service endpoints to communicate. Whenever you run `amplify push` or rebuild your web application by running `git commit`, this file is automatically created, allowing you to focus on your application code. The Amplify CLI places this file in the appropriate source directory configured with `amplify init`.

You won’t see updates to this file in your local file store because it is included in the *.gitignore*file.

### Create a New User for the User Pool

Visit the /auth directory of the Wild Rydes website domain. You could also choose the Giddy Up! Button on the homepage.

Click on Create Account and complete registration. You can choose a real email or a fake email. I chose a real email for this lab to test the email delivery capabilities. Ensure that the password meets the minimum requirements (one uppercase letter, a number, and a special character).&#x20;

<figure><img src="https://450836410-files.gitbook.io/~/files/v0/b/gitbook-x-prod.appspot.com/o/spaces%2Fgns9cN7UvH1POIBCfrRn%2Fuploads%2FL8JE2IvkcoW2GIsotH8P%2Fimage.png?alt=media&#x26;token=2cb0d8cb-b070-49bc-b1fe-8f549a059790" alt=""><figcaption></figcaption></figure>

<figure><img src="https://450836410-files.gitbook.io/~/files/v0/b/gitbook-x-prod.appspot.com/o/spaces%2Fgns9cN7UvH1POIBCfrRn%2Fuploads%2FDuSLBBZAG4e6J8MTdpam%2Fimage.png?alt=media&#x26;token=1104fa27-f980-4014-a252-a856fc13325d" alt=""><figcaption></figcaption></figure>

If you use a real email, you will receive a code. If you use a fake email, you must confirm the user through the Cognito console.

<figure><img src="https://450836410-files.gitbook.io/~/files/v0/b/gitbook-x-prod.appspot.com/o/spaces%2Fgns9cN7UvH1POIBCfrRn%2Fuploads%2FrQLeiYd3OW9Gs5e26sht%2Fimage.png?alt=media&#x26;token=9641cd00-ee0d-43a4-8635-de9f9dc6e4b3" alt=""><figcaption></figcaption></figure>

Verification code sent to my email.

<figure><img src="https://450836410-files.gitbook.io/~/files/v0/b/gitbook-x-prod.appspot.com/o/spaces%2Fgns9cN7UvH1POIBCfrRn%2Fuploads%2F4UpSSKUVGr6Ozud0BILq%2Fimage.png?alt=media&#x26;token=122f6b1e-5861-4d50-9524-71f3512b73a3" alt=""><figcaption></figcaption></figure>

After confirmation, sign back into the application console.

<figure><img src="https://450836410-files.gitbook.io/~/files/v0/b/gitbook-x-prod.appspot.com/o/spaces%2Fgns9cN7UvH1POIBCfrRn%2Fuploads%2FyTLRmSwvfXaWj9mFmlfO%2Fimage.png?alt=media&#x26;token=de8bd589-7beb-4437-ab8a-2d659382991e" alt=""><figcaption></figcaption></figure>

After successfully logging in, you will be redirected to /ride. There should be a notification that the API has not been configured and an authentication token.

<figure><img src="https://450836410-files.gitbook.io/~/files/v0/b/gitbook-x-prod.appspot.com/o/spaces%2Fgns9cN7UvH1POIBCfrRn%2Fuploads%2F4BKlOkdSdY3XuS15EVSk%2Fimage.png?alt=media&#x26;token=5abd4ffe-08ab-4a64-813f-662dfe9b031e" alt=""><figcaption></figcaption></figure>

Just for fun, let’s decode the auth token. Find a JWT decoder and paste the token. We can see that this token contains my user information (username, phone number, email), authentication time, expiration date, etc.

<figure><img src="https://450836410-files.gitbook.io/~/files/v0/b/gitbook-x-prod.appspot.com/o/spaces%2Fgns9cN7UvH1POIBCfrRn%2Fuploads%2F8XthqTe5VUyxggEgidI4%2Fimage.png?alt=media&#x26;token=bcc9bbf0-17b4-4b92-be32-c399404e6a32" alt=""><figcaption></figcaption></figure>

## Serverless Backend

The next step is configuring the serverless backend using DynamoDB. AWS Lambda will be used to build a backend process for handling requests from the web app. Each time a user requests a unicorn, the Lambda function will be invoked. The Lambda function will select a unicorn, record the request in the DynamoDB table, and provide a response to the front-end application about the unicorn that was dispatched.&#x20;

<figure><img src="https://450836410-files.gitbook.io/~/files/v0/b/gitbook-x-prod.appspot.com/o/spaces%2Fgns9cN7UvH1POIBCfrRn%2Fuploads%2FBQVSymTR5E91h1rlJ5hT%2Fimage.png?alt=media&#x26;token=9cd7530b-a5ce-4bdf-b707-9b529a7b5aac" alt=""><figcaption></figcaption></figure>

### DynamoDB

Navigate to the DynamoDB console.

<figure><img src="https://450836410-files.gitbook.io/~/files/v0/b/gitbook-x-prod.appspot.com/o/spaces%2Fgns9cN7UvH1POIBCfrRn%2Fuploads%2F8HkL6VU8ZFmufw2eudQS%2Fimage.png?alt=media&#x26;token=98e5ced2-bc5e-47c6-a13d-bbb691443d40" alt=""><figcaption></figcaption></figure>

Create a table and name it Rides.&#x20;

The Partition Key will be RideId and a String value.

Ensure Table settings is set to Default settings.

<figure><img src="https://450836410-files.gitbook.io/~/files/v0/b/gitbook-x-prod.appspot.com/o/spaces%2Fgns9cN7UvH1POIBCfrRn%2Fuploads%2FTK3HrI4IUsaFz15ZceOm%2Fimage.png?alt=media&#x26;token=9257d9c6-083f-4a7d-87a0-4ae1e36f38c2" alt=""><figcaption></figcaption></figure>

Create the table. Once created and active, click on the table to open the settings.

<figure><img src="https://450836410-files.gitbook.io/~/files/v0/b/gitbook-x-prod.appspot.com/o/spaces%2Fgns9cN7UvH1POIBCfrRn%2Fuploads%2FEAJh6mo4ovKzzraR0GnR%2Fimage.png?alt=media&#x26;token=74207959-630c-413b-bcdd-ee8dbffd9320" alt=""><figcaption></figcaption></figure>

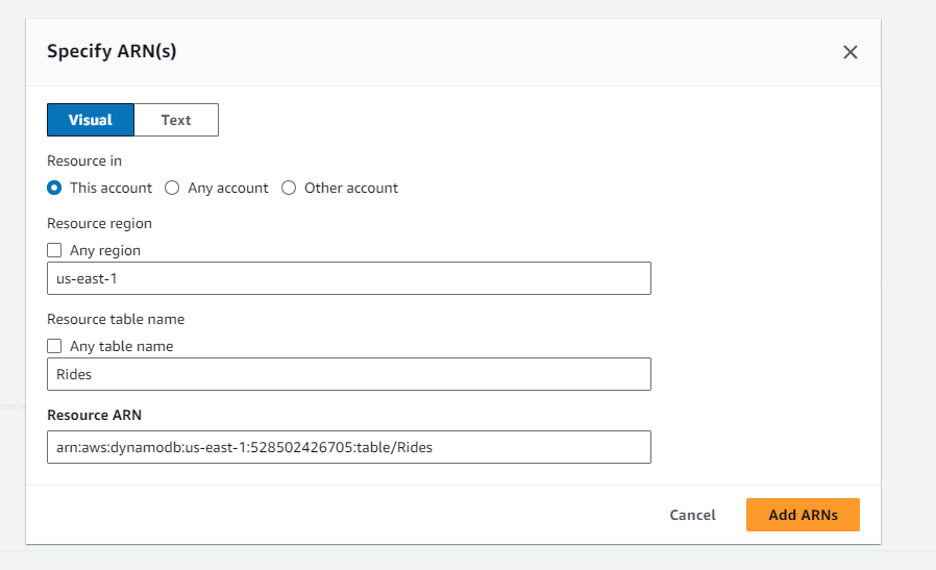
Under Overview > General Information > Additional Info, find the Amazon Resource Name (ARN) and record this value.

<figure><img src="https://450836410-files.gitbook.io/~/files/v0/b/gitbook-x-prod.appspot.com/o/spaces%2Fgns9cN7UvH1POIBCfrRn%2Fuploads%2FWo9jTT4aHlRcdLbKYueW%2Fimage.png?alt=media&#x26;token=01d0d13d-2561-4d21-b143-eec51a020b48" alt=""><figcaption></figcaption></figure>

### IAM

Next, an IAM role will need to be created for the Lambda function.&#x20;

Navigate to the IAM Console > Roles > Create Role

<figure><img src="https://450836410-files.gitbook.io/~/files/v0/b/gitbook-x-prod.appspot.com/o/spaces%2Fgns9cN7UvH1POIBCfrRn%2Fuploads%2FqoyLxppGPp28Cw0ECQwu%2Fimage.png?alt=media&#x26;token=ddc83449-cbf8-409a-b617-86ee74703d8d" alt=""><figcaption></figcaption></figure>

Select AWS Service and Lambda under Use Case.

<figure><img src="https://450836410-files.gitbook.io/~/files/v0/b/gitbook-x-prod.appspot.com/o/spaces%2Fgns9cN7UvH1POIBCfrRn%2Fuploads%2Fyd222iweDPsoerhTJuCV%2Fimage.png?alt=media&#x26;token=58ebc79c-85a3-4e90-8c7f-32e08af611ba" alt=""><figcaption></figcaption></figure>

After clicking Next, add AWSLambdaBasicExecutionRole policy.

<figure><img src="https://450836410-files.gitbook.io/~/files/v0/b/gitbook-x-prod.appspot.com/o/spaces%2Fgns9cN7UvH1POIBCfrRn%2Fuploads%2FDO0tmWFdUOInm1BejHJ9%2Fimage.png?alt=media&#x26;token=6cd083db-4c42-4ab2-9be8-8536fa8a3918" alt=""><figcaption></figcaption></figure>

Name the role WildRydesLambda and create the role.

<figure><img src="https://450836410-files.gitbook.io/~/files/v0/b/gitbook-x-prod.appspot.com/o/spaces%2Fgns9cN7UvH1POIBCfrRn%2Fuploads%2FzTwyzhY1duAyL5v6C2Ho%2Fimage.png?alt=media&#x26;token=c0eff1fb-ce70-4ee8-8dea-c735ab7c5a31" alt=""><figcaption></figcaption></figure>

Back in the IAM console, navigate to the role that was just created. Under Permission policies, select Add permissions > Create inline policy.

<figure><img src="https://450836410-files.gitbook.io/~/files/v0/b/gitbook-x-prod.appspot.com/o/spaces%2Fgns9cN7UvH1POIBCfrRn%2Fuploads%2FWJMbJO7eJV42AuzgEtZR%2Fimage.png?alt=media&#x26;token=98eb6a50-e032-41ac-b51f-c5ba962240d0" alt=""><figcaption></figcaption></figure>

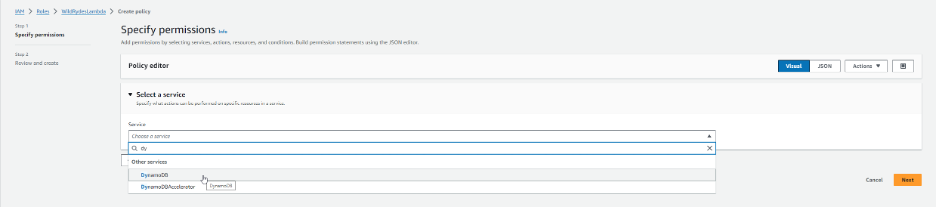
Click the drop down under Select a service and type in DynamoDB.

<figure><img src="https://450836410-files.gitbook.io/~/files/v0/b/gitbook-x-prod.appspot.com/o/spaces%2Fgns9cN7UvH1POIBCfrRn%2Fuploads%2F5qXjnzJKDYXh9O08T8Qr%2Fimage.png?alt=media&#x26;token=f908eb59-da23-4bbf-bd34-4c774ae56b10" alt=""><figcaption></figcaption></figure>

Ensure the details are correct and paste in the ARN that was copied earlier from the DymanoDB table. Click Add ARN.

<figure><img src="https://450836410-files.gitbook.io/~/files/v0/b/gitbook-x-prod.appspot.com/o/spaces%2Fgns9cN7UvH1POIBCfrRn%2Fuploads%2Fmwem0Vhc4pVk1UV63kph%2Fimage.png?alt=media&#x26;token=e44f3d81-c9ba-4702-ae85-656433725275" alt=""><figcaption></figcaption></figure>

Name the policy DynamoDBWriteAccess and create the policy.

<figure><img src="https://450836410-files.gitbook.io/~/files/v0/b/gitbook-x-prod.appspot.com/o/spaces%2Fgns9cN7UvH1POIBCfrRn%2Fuploads%2F4R4YOl6YeAmCd5uJokd9%2Fimage.png?alt=media&#x26;token=5420551f-f95e-43db-8af3-e94f0561d6f3" alt=""><figcaption></figcaption></figure>

### Lambda

This next step involves creating the Lambda function to process API requests.

1. Navigate to the AWS Lambda console.
2. Select Create function
3. Author from scratch
4. Name the function RequestUnicorn
5. Select Node.js 20.x for Runtime
6. Under Change default execution role, select the drop down to expand the section
7. Select WildRydesLambda under the Existing role drop down
8. Create the function

<figure><img src="https://450836410-files.gitbook.io/~/files/v0/b/gitbook-x-prod.appspot.com/o/spaces%2Fgns9cN7UvH1POIBCfrRn%2Fuploads%2FY0pwQwTEgjvtZbNhHdU3%2Fimage.png?alt=media&#x26;token=51f0e994-1509-4e82-b631-183908c9e3bf" alt=""><figcaption></figcaption></figure>

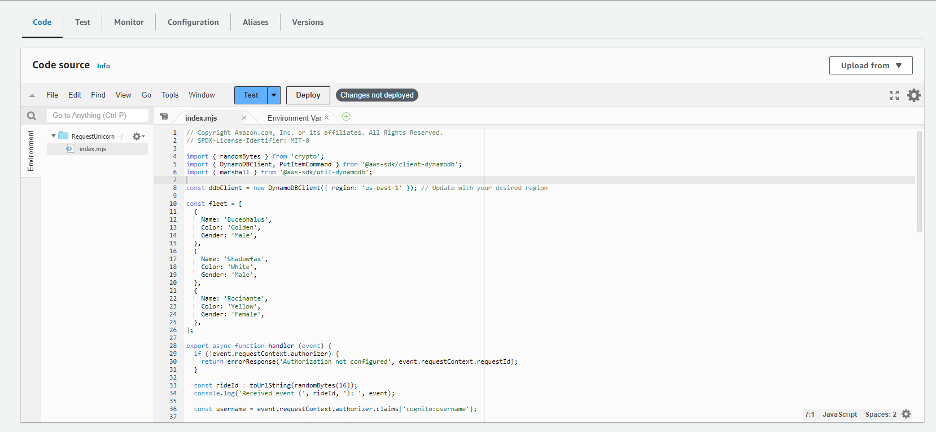
Scroll down to the Code source section and replace the code in index.js with [requestUnicorn.js](https://webapp.serverlessworkshops.io/3-serverlessbackend/4-lambda/requestUnicorn.js). Deploy the code afterward by clicking the “Deploy” button.

<figure><img src="https://450836410-files.gitbook.io/~/files/v0/b/gitbook-x-prod.appspot.com/o/spaces%2Fgns9cN7UvH1POIBCfrRn%2Fuploads%2FwKZT4YuO2Pf1LNNft2Py%2Fimage.png?alt=media&#x26;token=c9e11faf-931e-4224-8ed6-e6d0d09cc5df" alt=""><figcaption></figcaption></figure>

Navigate to the Test tab and configure a test event.

Create new event.

Name the event TestRequestEvent.

<figure><img src="https://450836410-files.gitbook.io/~/files/v0/b/gitbook-x-prod.appspot.com/o/spaces%2Fgns9cN7UvH1POIBCfrRn%2Fuploads%2FcXLrN7bI0pPL97xcKm72%2Fimage.png?alt=media&#x26;token=b4fa9fc4-1f60-458f-ab2d-552c58e4ebf8" alt=""><figcaption></figcaption></figure>

Copy and paste this JSON Event into the editor.

```
{
    "path": "/ride",
    "httpMethod": "POST",
    "headers": {
        "Accept": "*/*",
        "Authorization": "eyJraWQiOiJLTzRVMWZs",
        "content-type": "application/json; charset=UTF-8"
    },
    "queryStringParameters": null,
    "pathParameters": null,
    "requestContext": {
        "authorizer": {
            "claims": {
                "cognito:username": "the_username"
            }
        }
    },
    "body": "{\"PickupLocation\":{\"Latitude\":47.6174755835663,\"Longitude\":-122.28837066650185}}"
}

```

<figure><img src="https://450836410-files.gitbook.io/~/files/v0/b/gitbook-x-prod.appspot.com/o/spaces%2Fgns9cN7UvH1POIBCfrRn%2Fuploads%2FkYT5SPouDI5mxtmhfp4Y%2Fimage.png?alt=media&#x26;token=dfc164e6-410e-4b43-87f4-39c3afac57bc" alt=""><figcaption></figcaption></figure>

Save and Test.

Under the Details section, verify that the execution was successful.

<figure><img src="https://450836410-files.gitbook.io/~/files/v0/b/gitbook-x-prod.appspot.com/o/spaces%2Fgns9cN7UvH1POIBCfrRn%2Fuploads%2FYy7Xubh7fPhVQsjGRqmt%2Fimage.png?alt=media&#x26;token=d8cc707e-1105-4f60-89d9-dd5d1ce551b9" alt=""><figcaption></figcaption></figure>

## RESTful API

### REST API

API Gateway will be configured to expose the Lambda function as a RESTful API. Although the API will be exposed, it will be secured using the Cognito user pool.&#x20;

<figure><img src="https://450836410-files.gitbook.io/~/files/v0/b/gitbook-x-prod.appspot.com/o/spaces%2Fgns9cN7UvH1POIBCfrRn%2Fuploads%2F8eU5Gx7jIIw0Th87uSsn%2Fimage.png?alt=media&#x26;token=69cdf1cf-99c1-45da-8630-284562455048" alt=""><figcaption></figcaption></figure>

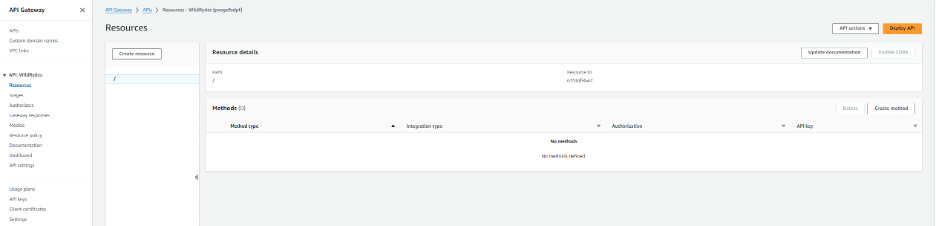
Navigate to the API Gateway console.

Scroll down and select REST API.

<figure><img src="https://450836410-files.gitbook.io/~/files/v0/b/gitbook-x-prod.appspot.com/o/spaces%2Fgns9cN7UvH1POIBCfrRn%2Fuploads%2FRja8QPunVweHHm8ONfER%2Fimage.png?alt=media&#x26;token=b45de0c7-7b44-4db4-b258-7e4959eef439" alt=""><figcaption></figcaption></figure>

1. Select New API
2. Name the API WildRydes
3. Under API endpoint type, select Regional
4. Create the API

<figure><img src="https://450836410-files.gitbook.io/~/files/v0/b/gitbook-x-prod.appspot.com/o/spaces%2Fgns9cN7UvH1POIBCfrRn%2Fuploads%2FD5aySW0hgopfx0wVBpht%2Fimage.png?alt=media&#x26;token=10d08731-18d5-49f8-b46d-c97ddfaeccc8" alt=""><figcaption></figcaption></figure>

You should see the API successfully created in the console.

<figure><img src="https://450836410-files.gitbook.io/~/files/v0/b/gitbook-x-prod.appspot.com/o/spaces%2Fgns9cN7UvH1POIBCfrRn%2Fuploads%2F3lluG5kccWhrVeSgPiVC%2Fimage.png?alt=media&#x26;token=03e6122d-be07-40a4-9a87-c92b0ab387f0" alt=""><figcaption></figcaption></figure>

### Cognito

1. In the API Gateway Console, create a new Cognito user pool authorizer for the API.&#x20;
2. Under the API, choose Authorizers and Create New Authorizer
3. Name the Authorizer WildRydes
4. Select Cognito for Authorizer type
5. Under Cognito user pool, select the Region where the Cognito user pool was created and the name of the Cognito user pool
6. The token source is Authorization
7. Create authorizer

<figure><img src="https://450836410-files.gitbook.io/~/files/v0/b/gitbook-x-prod.appspot.com/o/spaces%2Fgns9cN7UvH1POIBCfrRn%2Fuploads%2FaE5JT0eym90dR3l0JOuF%2Fimage.png?alt=media&#x26;token=1478c6a5-db08-459c-bea4-f8ca50fdf0b9" alt=""><figcaption></figcaption></figure>

Verify the authorizer configuration

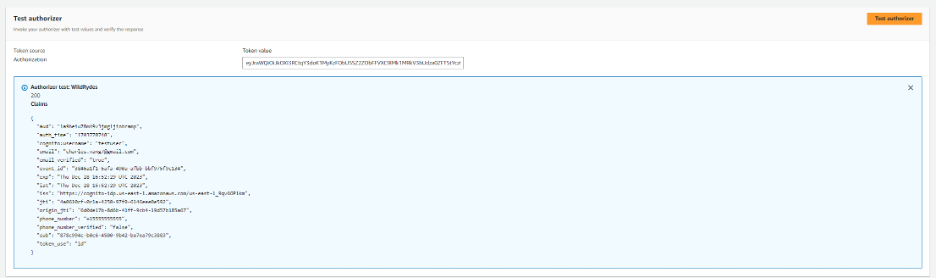
1. Open a new browser tab and visit the /ride endpoint under the application domain.
2. Copy the authentication token from the notification window.
3. Return to the Authorizer page in AWS
4. Paste the authentication token into the Token Value under Test Authorizer

<figure><img src="https://450836410-files.gitbook.io/~/files/v0/b/gitbook-x-prod.appspot.com/o/spaces%2Fgns9cN7UvH1POIBCfrRn%2Fuploads%2FUItapBezaJLekbvg7BWy%2Fimage.png?alt=media&#x26;token=924a524e-37e0-41ac-b1cc-68b90ad05484" alt=""><figcaption></figcaption></figure>

Click the Test button and ensure that you receive a 200 response code.

<figure><img src="https://450836410-files.gitbook.io/~/files/v0/b/gitbook-x-prod.appspot.com/o/spaces%2Fgns9cN7UvH1POIBCfrRn%2Fuploads%2FHQHKnUwgmifsYyMQYs3F%2Fimage.png?alt=media&#x26;token=1b812bc3-83f0-4f36-88f0-9a934c10137c" alt=""><figcaption></figcaption></figure>

### API Resource

Return to the API Gateway console and select Resources under the new API.

<figure><img src="https://450836410-files.gitbook.io/~/files/v0/b/gitbook-x-prod.appspot.com/o/spaces%2Fgns9cN7UvH1POIBCfrRn%2Fuploads%2FZw8JtLY8yh17ZEzBwy0C%2Fimage.png?alt=media&#x26;token=b07170f5-89cb-471e-a225-61b578a7b1dc" alt=""><figcaption></figcaption></figure>

1. Under Actions, select Create Resource
2. Enter ride as the Resource Name
3. Enable CORS
4. Create Resource

<figure><img src="https://450836410-files.gitbook.io/~/files/v0/b/gitbook-x-prod.appspot.com/o/spaces%2Fgns9cN7UvH1POIBCfrRn%2Fuploads%2Fy6ku0LBok77DtV8wdjJL%2Fimage.png?alt=media&#x26;token=61a62761-777c-4ba3-862d-1c8cb5afbaab" alt=""><figcaption></figcaption></figure>

5. Within the console, the new /ride resource should have populated.

<figure><img src="https://450836410-files.gitbook.io/~/files/v0/b/gitbook-x-prod.appspot.com/o/spaces%2Fgns9cN7UvH1POIBCfrRn%2Fuploads%2Fi36wX9pLXApwa5vToJyV%2Fimage.png?alt=media&#x26;token=3ccae5fe-9cb7-48b9-9dd5-78b1602f7399" alt=""><figcaption></figcaption></figure>

6. Select Create Method
7. Method Type is POST
8. Select Lambda function
9. Enable Lambda Proxy Integration
10. Select the correct region where the Lambda function is located
11. Enter the name of the Lambda function
12. Create Method

<figure><img src="https://450836410-files.gitbook.io/~/files/v0/b/gitbook-x-prod.appspot.com/o/spaces%2Fgns9cN7UvH1POIBCfrRn%2Fuploads%2FY8RhU2RdlfZJg37jAtbH%2Fimage.png?alt=media&#x26;token=89e60df6-af8d-44c3-a2a3-c4ee23c4fb9a" alt=""><figcaption></figcaption></figure>

<figure><img src="https://450836410-files.gitbook.io/~/files/v0/b/gitbook-x-prod.appspot.com/o/spaces%2Fgns9cN7UvH1POIBCfrRn%2Fuploads%2F0IGypB4XfFPjovhQD8Q3%2Fimage.png?alt=media&#x26;token=10b0724f-4e57-479d-af3a-56669bc5f1f5" alt=""><figcaption></figcaption></figure>

Edit the method request.&#x20;

Under Authorization, select WildRydes

<figure><img src="https://450836410-files.gitbook.io/~/files/v0/b/gitbook-x-prod.appspot.com/o/spaces%2Fgns9cN7UvH1POIBCfrRn%2Fuploads%2FZZDwcm05VcZUT4M79Ts6%2Fimage.png?alt=media&#x26;token=2cebe8fd-a44c-47c3-b652-d7b1bc75c48f" alt=""><figcaption></figcaption></figure>

<figure><img src="https://450836410-files.gitbook.io/~/files/v0/b/gitbook-x-prod.appspot.com/o/spaces%2Fgns9cN7UvH1POIBCfrRn%2Fuploads%2FbN3XqVgXgFAgTnL8IVMx%2Fimage.png?alt=media&#x26;token=5aef9477-c616-44d4-bf93-19572ffb40a9" alt=""><figcaption></figcaption></figure>

### Deploy

1. Under the Actions drop-down list, select Deploy API
2. Choose New Stage under Stage&#x20;
3. The Stage Name is prod
4. Deploy the API

<figure><img src="https://450836410-files.gitbook.io/~/files/v0/b/gitbook-x-prod.appspot.com/o/spaces%2Fgns9cN7UvH1POIBCfrRn%2Fuploads%2FS5R14WvDAPkst2QXD732%2Fimage.png?alt=media&#x26;token=50d6870f-7e45-4cef-9531-f9ef0496712e" alt=""><figcaption></figcaption></figure>

Take note of the Invoke URL

<figure><img src="https://450836410-files.gitbook.io/~/files/v0/b/gitbook-x-prod.appspot.com/o/spaces%2Fgns9cN7UvH1POIBCfrRn%2Fuploads%2FDFbpmgFU4HtDEfXmPFEC%2Fimage.png?alt=media&#x26;token=4c5ad308-5bad-4a42-afb5-c6c461669700" alt=""><figcaption></figcaption></figure>

### Update Configuration

Return to the Cloud9 IDE. Under /src/config.js, update the invoke URL to the one that was copied in the previous step. Save the changes.

<figure><img src="https://450836410-files.gitbook.io/~/files/v0/b/gitbook-x-prod.appspot.com/o/spaces%2Fgns9cN7UvH1POIBCfrRn%2Fuploads%2FLwLtuzPp4ppB3oYrqpyc%2Fimage.png?alt=media&#x26;token=af13b647-c18b-4263-8023-35db3bdecddd" alt=""><figcaption></figcaption></figure>

Commit the changes to the git repository.

```
git add src/config.js 
   
git commit -m "Configure API invokeURL"
   
git push
```

<figure><img src="https://450836410-files.gitbook.io/~/files/v0/b/gitbook-x-prod.appspot.com/o/spaces%2Fgns9cN7UvH1POIBCfrRn%2Fuploads%2FyBJxsqlMhstCk7xoznyz%2Fimage.png?alt=media&#x26;token=0609a97f-03bc-4acf-bf2c-9a9198e61aaf" alt=""><figcaption></figcaption></figure>

Under the Amplify console, you will see the app begin to deploy with the new changes under the Amplify console, you will see the app begin to deploy with the new changes.

<figure><img src="https://450836410-files.gitbook.io/~/files/v0/b/gitbook-x-prod.appspot.com/o/spaces%2Fgns9cN7UvH1POIBCfrRn%2Fuploads%2FMJDIa2MHISFmUcAtwOHb%2Fimage.png?alt=media&#x26;token=a69db008-e0cc-42f5-889b-64d2536968c1" alt=""><figcaption></figcaption></figure>

<figure><img src="https://450836410-files.gitbook.io/~/files/v0/b/gitbook-x-prod.appspot.com/o/spaces%2Fgns9cN7UvH1POIBCfrRn%2Fuploads%2FUWbGpwSRjWnJDScpYQvj%2Fimage.png?alt=media&#x26;token=0b377cb9-ebfe-4dff-88ab-22f2e0bf7985" alt=""><figcaption></figcaption></figure>

Navigate to the /ride endpoint for the web application.&#x20;

Sign in if requested to.&#x20;

The map should now load without the notification window.

<figure><img src="https://450836410-files.gitbook.io/~/files/v0/b/gitbook-x-prod.appspot.com/o/spaces%2Fgns9cN7UvH1POIBCfrRn%2Fuploads%2FcZg3QsFNVpCPMn7hiAIH%2Fimage.png?alt=media&#x26;token=14d3a3ed-7584-46db-9757-9c40262ccc56" alt=""><figcaption></figcaption></figure>

Select a location on the map to set a pickup location.&#x20;

Choose Request Unicorn and you will see a message in the upper right corner that says a unicorn is on its way. A unicorn icon will then fly to the selected location.

<figure><img src="https://450836410-files.gitbook.io/~/files/v0/b/gitbook-x-prod.appspot.com/o/spaces%2Fgns9cN7UvH1POIBCfrRn%2Fuploads%2FQC93oa9n8Q8PDqMabM4g%2Fimage.png?alt=media&#x26;token=8adcfcb9-e726-48bf-8e94-8336d8a5187d" alt=""><figcaption></figcaption></figure>
